How do I find out the current IP address of my printers?
Table of Contents
There are two ways to achieve this: directly via your printer or via the orderbird PRO app.
Let's go
Find out the IP address by printing the status document
Turn your printer off and wait at least 30 seconds. Then turn it back on.
Was a status document printed automatically?
The current IP address of the printer is shown in the "Ip Address" line on the status receipt :).
Then you can trigger the print manually.
What color is the printer LED?
- Ensure the printer remains powered on.
- Using a pointed object, such as a ballpoint pen, press and hold the reset button until a sheet of paper is printed.
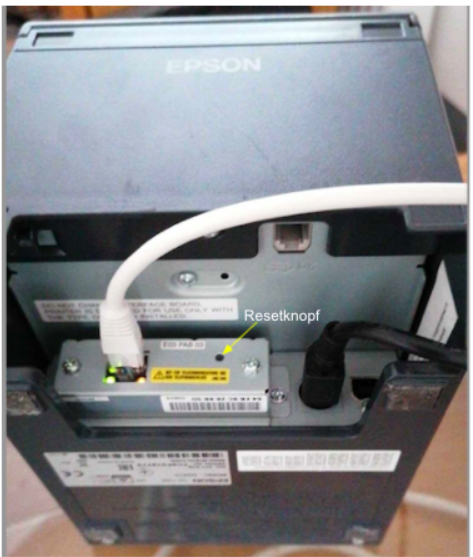
- Locate the IP address on the printed paper under the "TCP/IP Status" section.
- Ensure the printer remains powered on.
- Using a pointed object, such as a ballpoint pen, press and hold the reset button until a sheet of paper is printed.
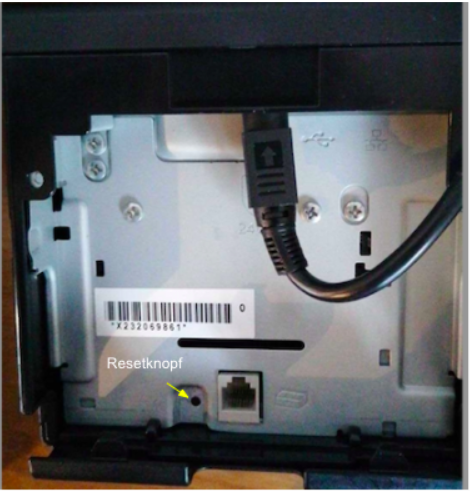
- Locate the IP address on the printed paper under the "TCP/IP Status" section.
Find out the IP address of the printer in the orderbird app
Printer settings in detail: How do I set up my printers?
You've just added a new printer to your equipment fleet? Or you want the order slips for smoothies to be printed in the kitchen instead of at the counter? Here we explain all the settings you can define for your printer in the orderbird app.
All devices logged in the same Wi-Fi?
In order to be able to change and control the settings on the printer, your iPad must be on the same network as your printer, e.g. orderbird Wi-Fi. Only then can your printer communicate with the app.
In a nutshell
- Check if your printer(s) and your iPad are on the same network so that the settings take effect.
- Enable or disable printers.
- Name, IP address and port must be set correctly for the printer to print.
- Especially for check-out businesses, it can be useful to enable the setting "Device specific invoice printer".
Let's go!
Where can I change the settings for my printer?
- In the main menu of the orderbird app, go to Settings > Printer.
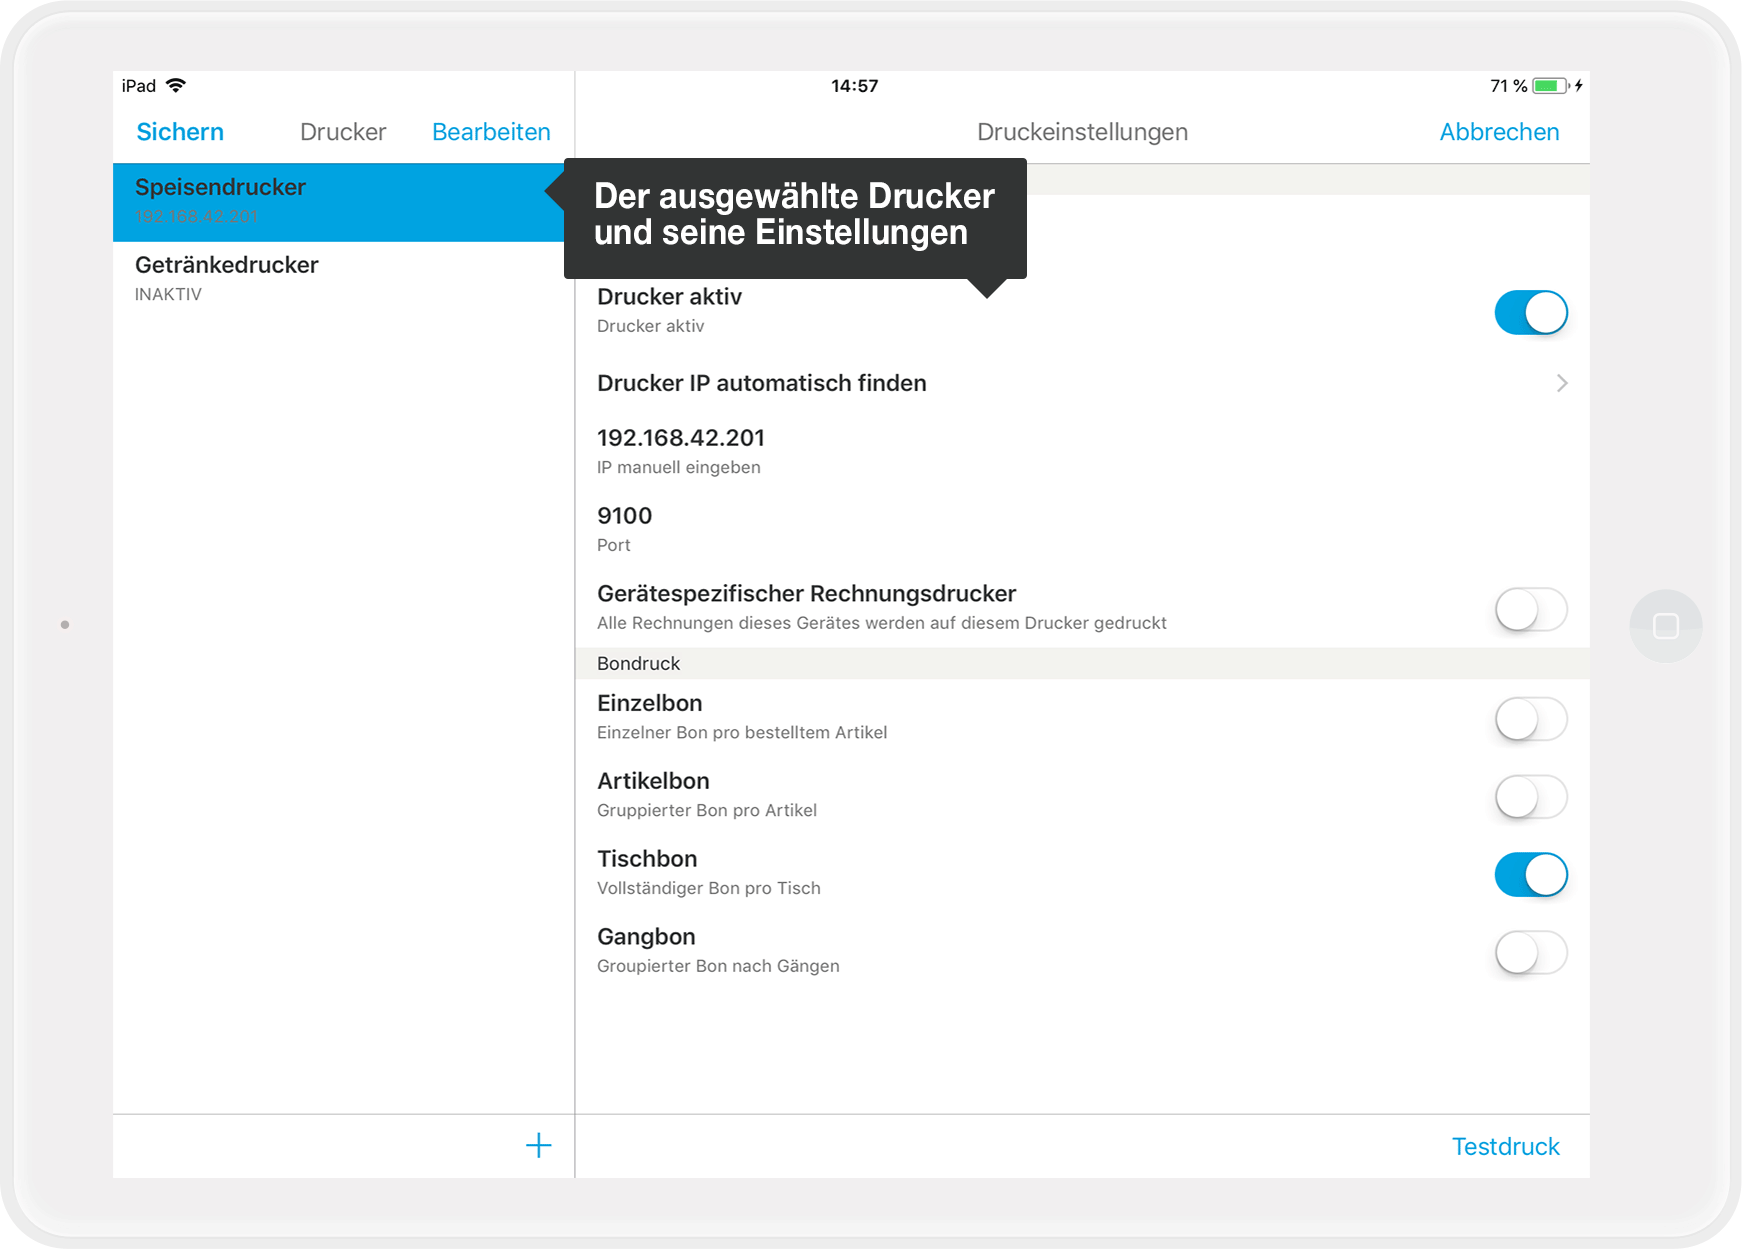
- Tap on the left on the printer for which you want to change the settings. The settings menu of the currently selected printer will now open on the right side.
What can I set for my printers?
You can make the following settings for your printers:
- "Name": Name your printer best after the location of the printer or after the products, which should be printed on it (e.g. "Beverage printer" or "Counter printer").
- "Active": If you use a printer only sometimes (e.g. only at events), you can quickly activate or deactivate it here. Move the slider to blue (active) or white (inactive).
- "Find printer IP automatically": If you don't know the printer IP - which is usually the case - you can have the address found automatically. Tap once on the field "Find printer IP automatically" and a new window will open. Now you will see all available printers and their IP addresses in the orderbird network. Tap on an IP address to select it for your printer. You can find more detailed instructions here: Leitfaden zur Lösung von Druckerproblemen (German only)
- "Enter IP manually": Here you can also enter the IP address of your printer directly, if you know it.
- "Port": Attention! This must always be set to 9100 for all your printers.
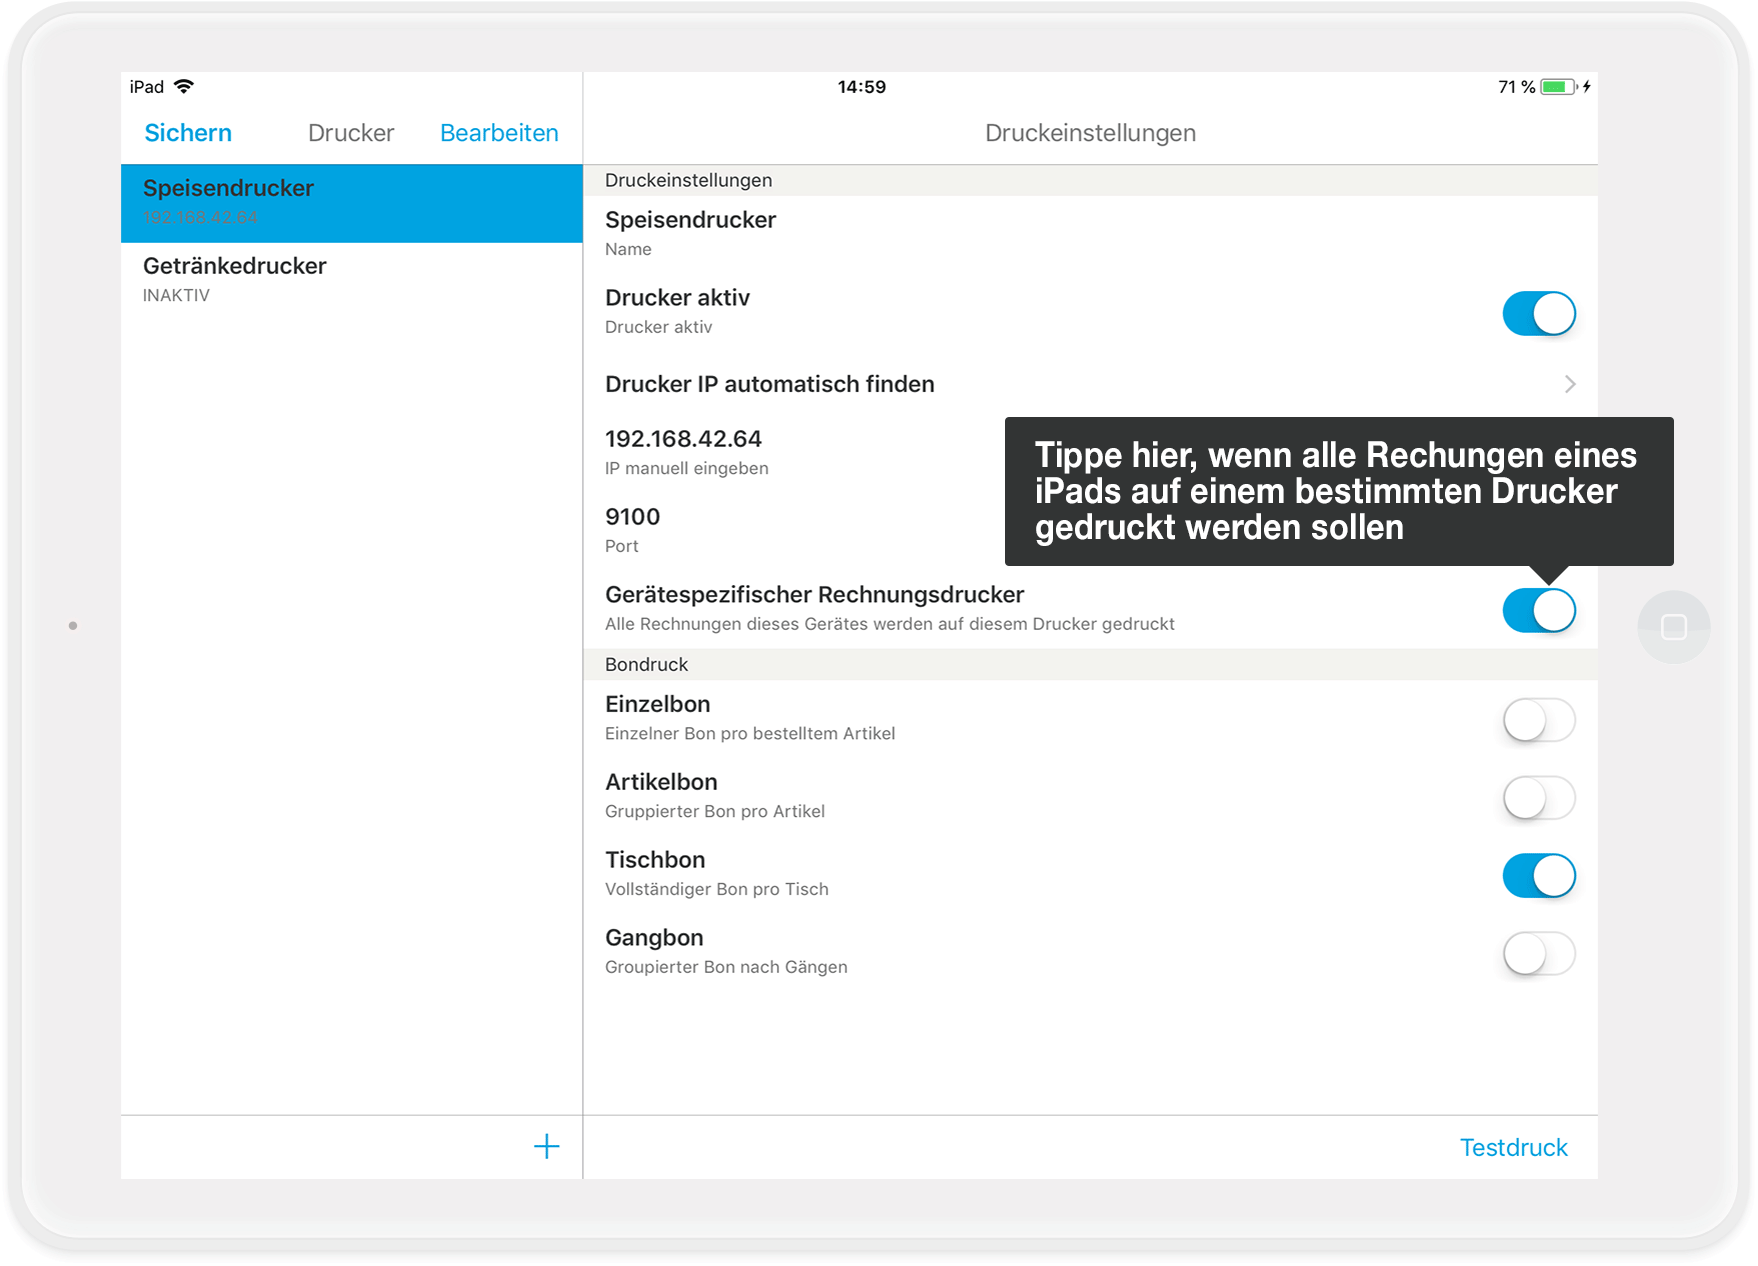
- "Device specific invoice printer": This setting is especially interesting for check-out restaurants. By default, a receipt printer is assigned to certain tables. If you enable "Device specific invoice printer", then you override the default and assign selected iPads/iPods to an invoice printer instead. Just read on here: Option 2: Device specific invoice printer
How can I set up a (new) printer?
First, make sure that your iPad/iPod is connected to the same WLAN as the printer (in most cases with "orderbird Wi-Fi" in the name). You can check the WLAN connection in the device settings under the menu item "WLAN".
- Open the orderbird app and tap on Settings > Printer. All printers stored in the app are listed there. It is possible to add another printer via the plus sign "+" at the bottom right. By default, we always create two printers.
- To activate one of the printers, click on the printer name and drag the slider to active. Then click on the field "Automatically find printer IP".
- The app will now automatically search for all available printers in the network and display them in a new window. You select one of these printers from the overview, and it is then stored as a printer:
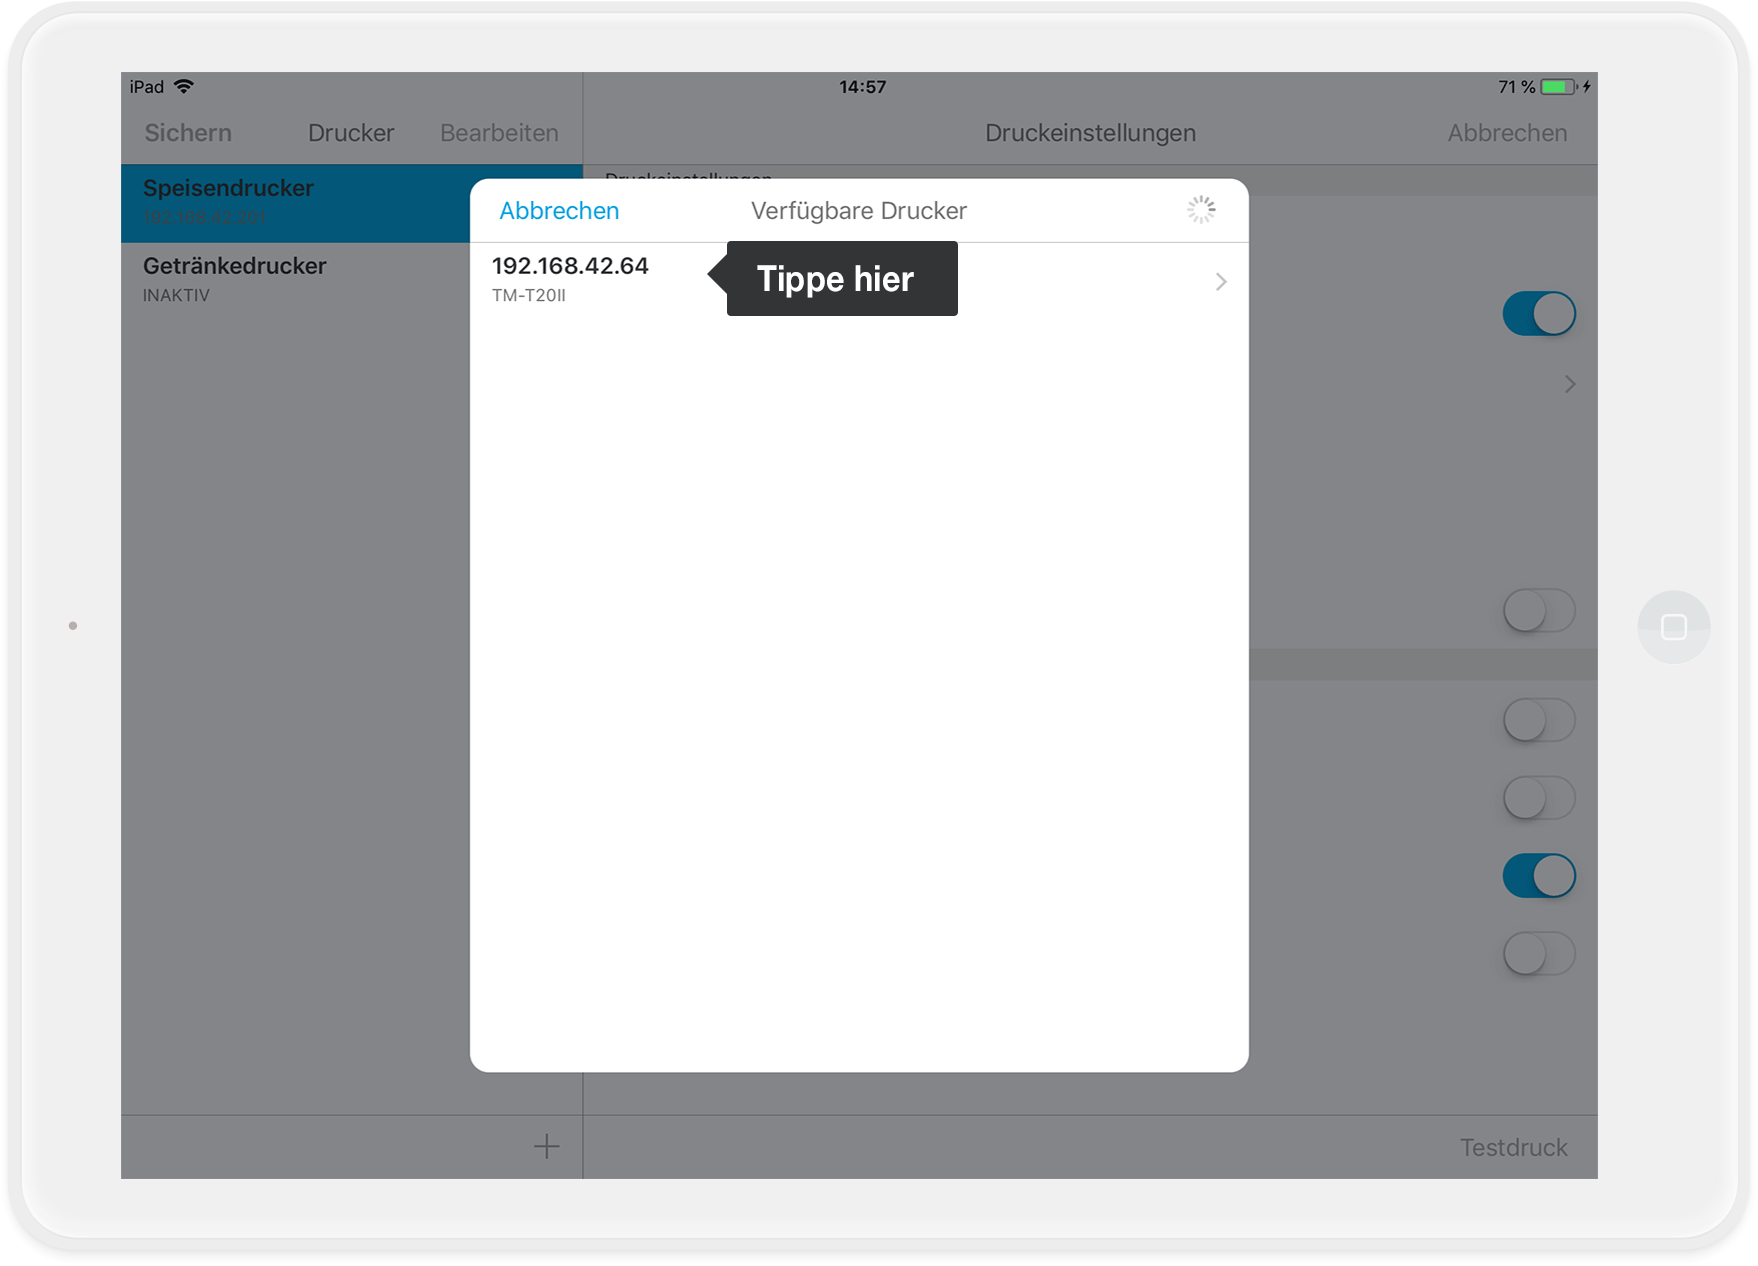
- After selecting a printer from the "Available printers" view, you are taken back to the printer settings in the app.
- There, you can print a test receipt via "Test print" in the lower right corner.
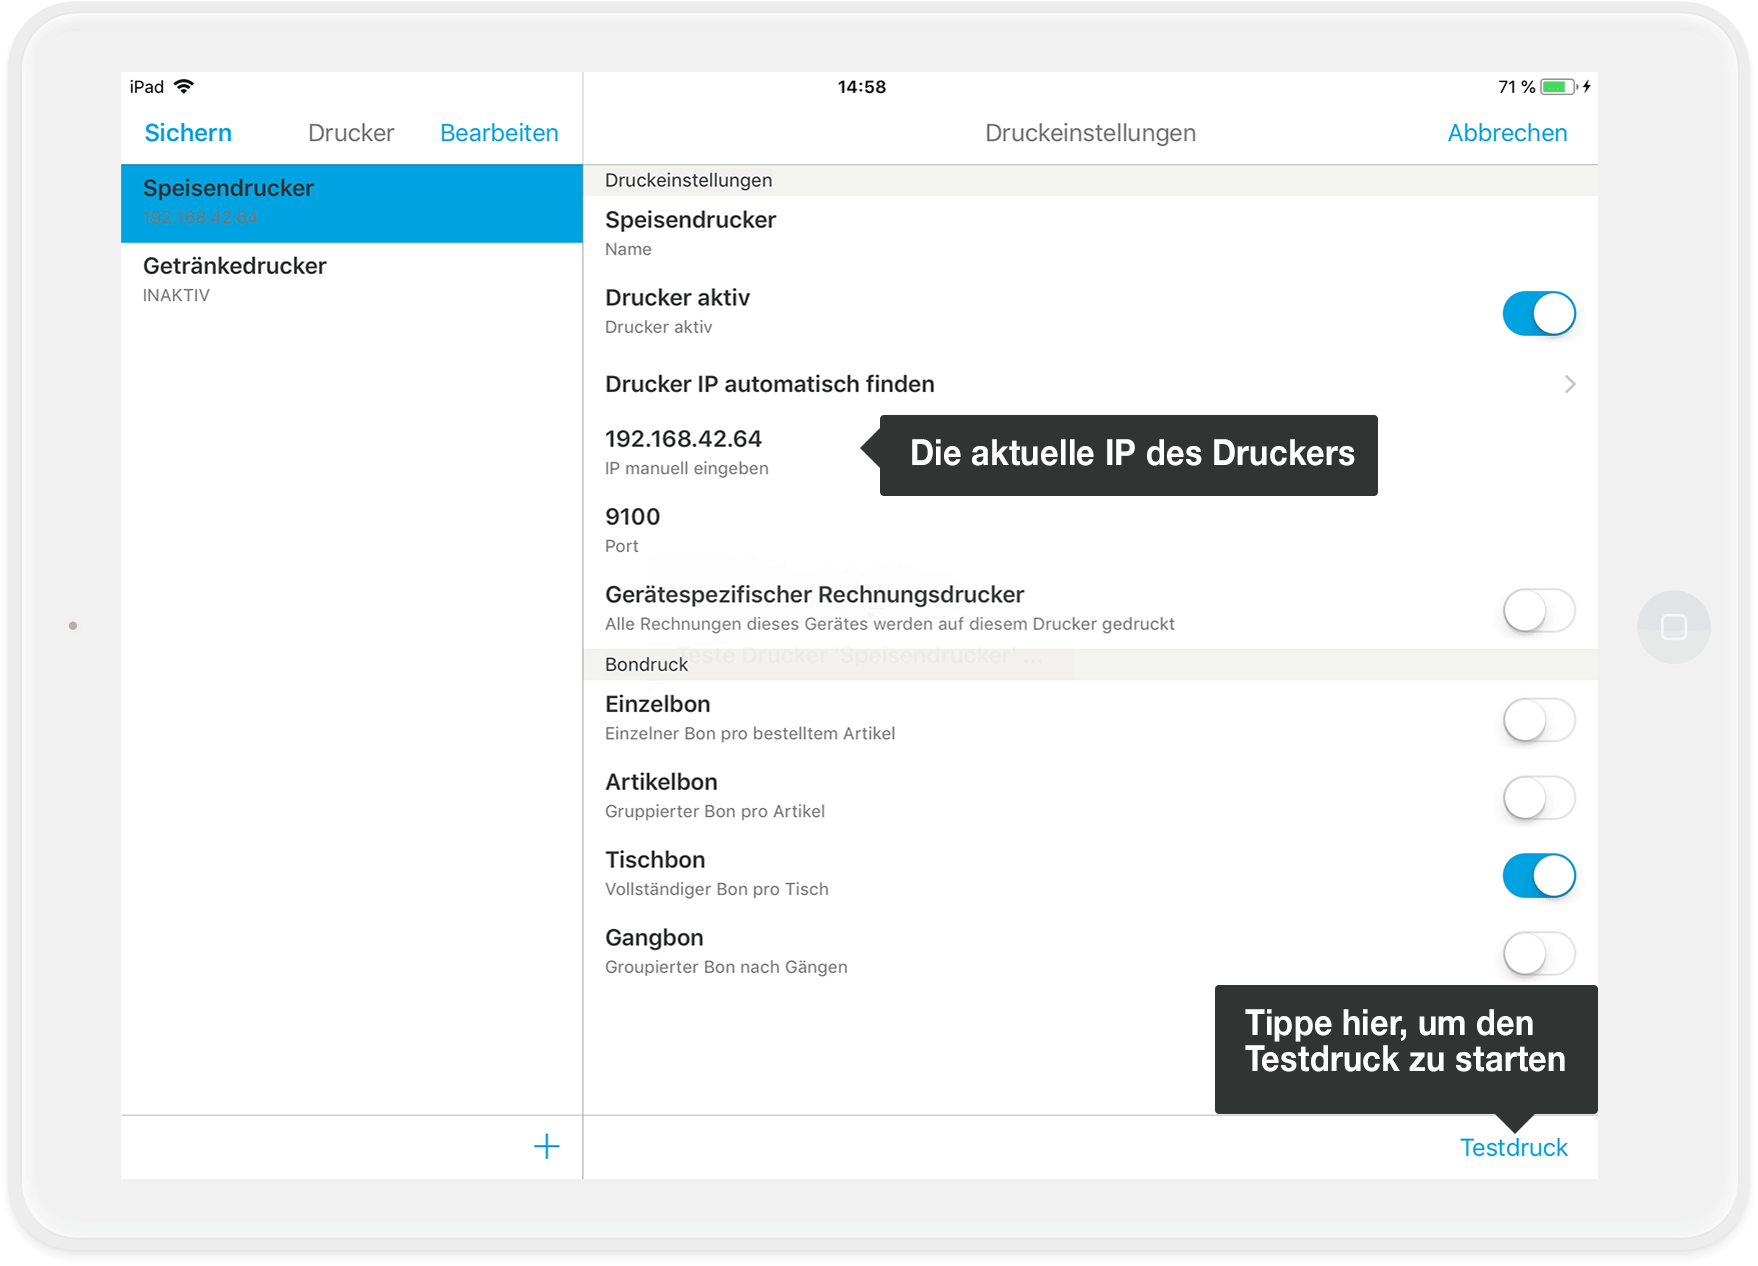
This way, you can check if the printer you have set up is in the right place in your store - if not, you can assign a different printer via the "IP" field.
How do I define a receipt printer?
You want to save ways when a receipt is printed? Then you can e.g. assign tables that are close to the kitchen printer as receipt printer. Or if you have a take-out with two POS iPads and two printers, you can also set that all receipts from iPad 1 are printed on printer 1 and all receipts from iPad 2 on printer 2.
Option 1: Assign receipt printers via the tables
Tap on Settings > Tables. Here, you can assign a printer to each table.
Tap on "Edit" at the top and select all tables you want to assign to a printer. Then tap on "Select printer" at the bottom left and assign a printer to the tables. But be careful: This only affects the receipts!
Option 2: Device specific invoice printer
In a business with 2 cash registers and one printer at each counter, both cash registers can book to the same table and the receipt still comes out at different printers? Sounds magical? But it is actually possible :). For the respective device on which this setting is active, the assignment of the receipt printers via the tables is then automatically ignored.
This is how it works!
- Open the settings in the orderbird app and go to "Printers".
- Now activate the settings "device specific invoice printer" on the device from which the receipts should be sent.
Can I assign family groups or items to a printer?
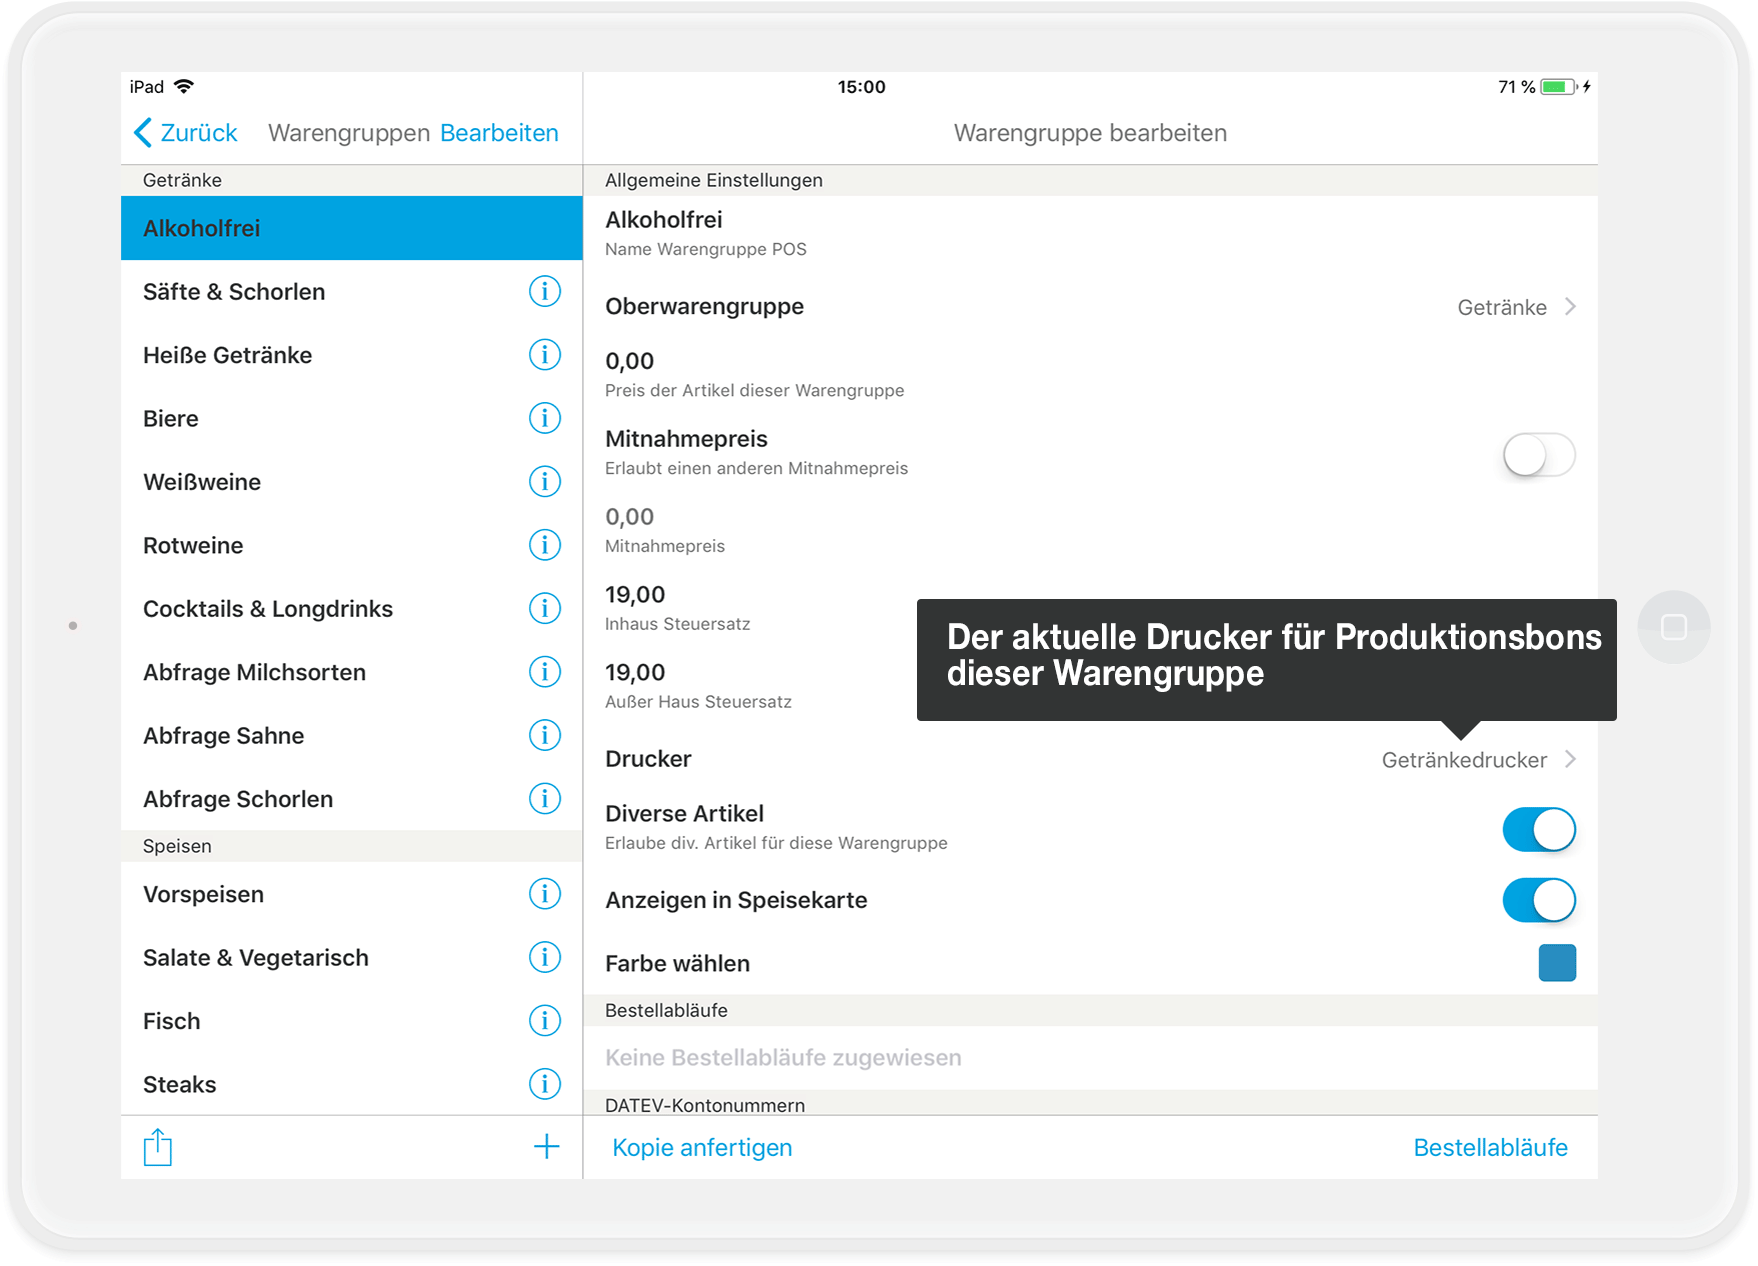
Yes! Which items are printed on which printer always depends on which department is assigned to which printer (see picture). However, you have the possibility that items of certain merchandise groups can be printed on several printers. Simply select multiple printers.
- In the app, go to Settings > Order block > Menu.
- Click on the small "i" next to the merchandise group for which you want to change the printer assignment.
- Tap Printer and select one or more printers.
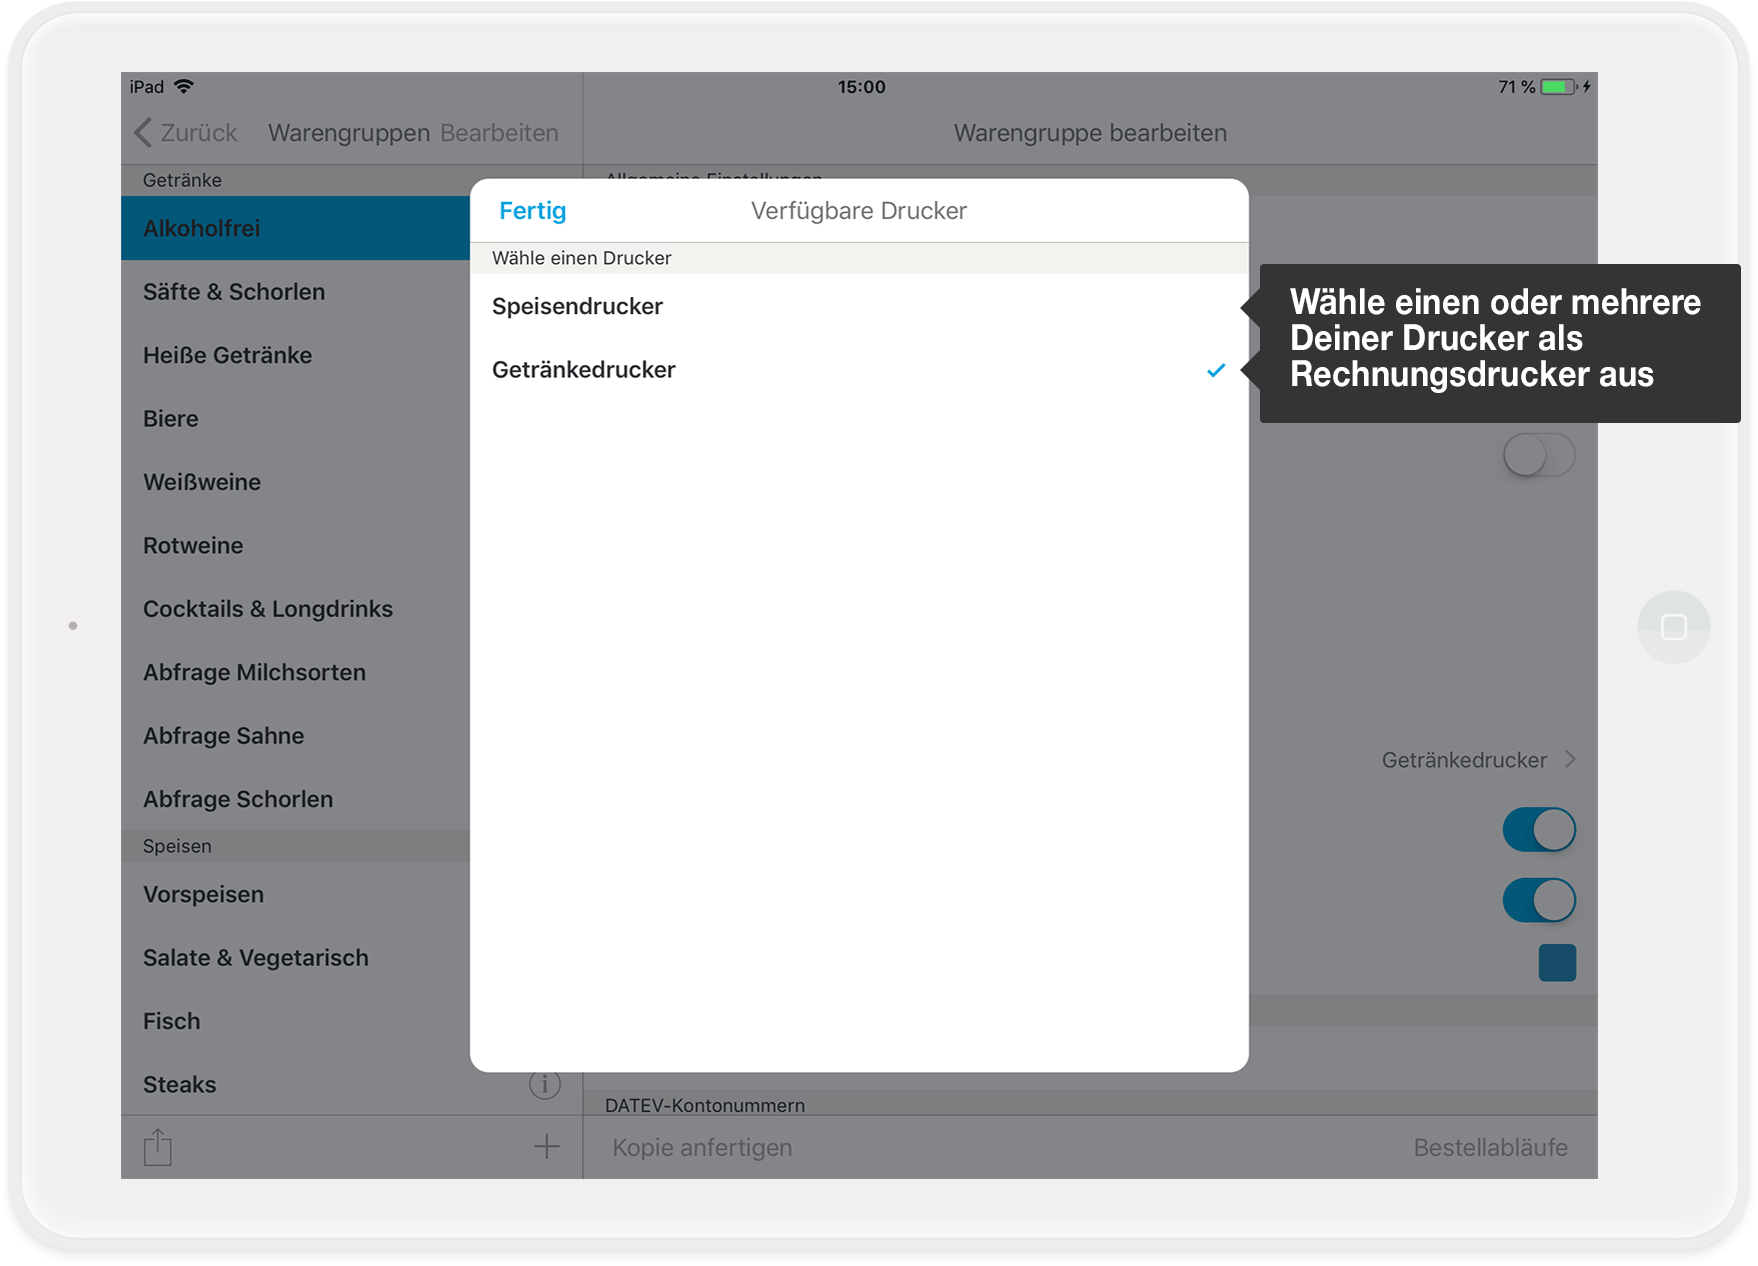
- Tap on "Done" and then on "Save".
Can I customize the receipt printing?
When you are in the printer overview (Settings>Printers), you can also set the receipt type for production printing. There are 3 different receipt types:
- Single docket: 1 receipt is printed per booked item
- Grouped docket: same items (e.g. 2x Cola) appear on a receipt, otherwise again 1 receipt per item
- Table docket: all items booked on one table are combined on one voucher.
- Course docket: separate receipt(s) are printed for each course.
You can select more than one receipt type at the same time, but the same receipt type cannot be printed 2x for the same order on the same printer. I.e. table receipt + item receipt for one order is possible, 2 table receipts for one order is not possible.
I have only one printer, but I want to have food and drinks on a separate receipt. How can I do that?
If you have only one printer, but you want to have a separate receipt for food and drinks, you can create virtual printers.
Go to Settings > Printers and create a second printer. For example, name it Kitchen Printer and the first Beverage Printer. Make sure that the second printer has the same IP address as the first one. Write down the IP address so that you can transfer it to the virtual printer.
Now you only have to go to the menu and assign the correct printer to each product group.
Now you will get, if you have set table receipt for both printers, a receipt on which all dishes of an order are printed and another receipt with all drinks of a booking.
Notes of your printer
Under Settings > Receipt printing, you can make your printer communicate. We have built a new error handling into the printer driver, which warns you if ...
- the paper has run out
- the printer is not available
- there is an error on the printer
- the flap is open
- the receipt/invoice has not been printed completely: The print is repeated with the note "connection print".
Within the app, you can see by the connection indicator (bar above the order block) if there is a connection to the printer:
- Green bar means "connection exists".
- Red bar means "connection is interrupted".
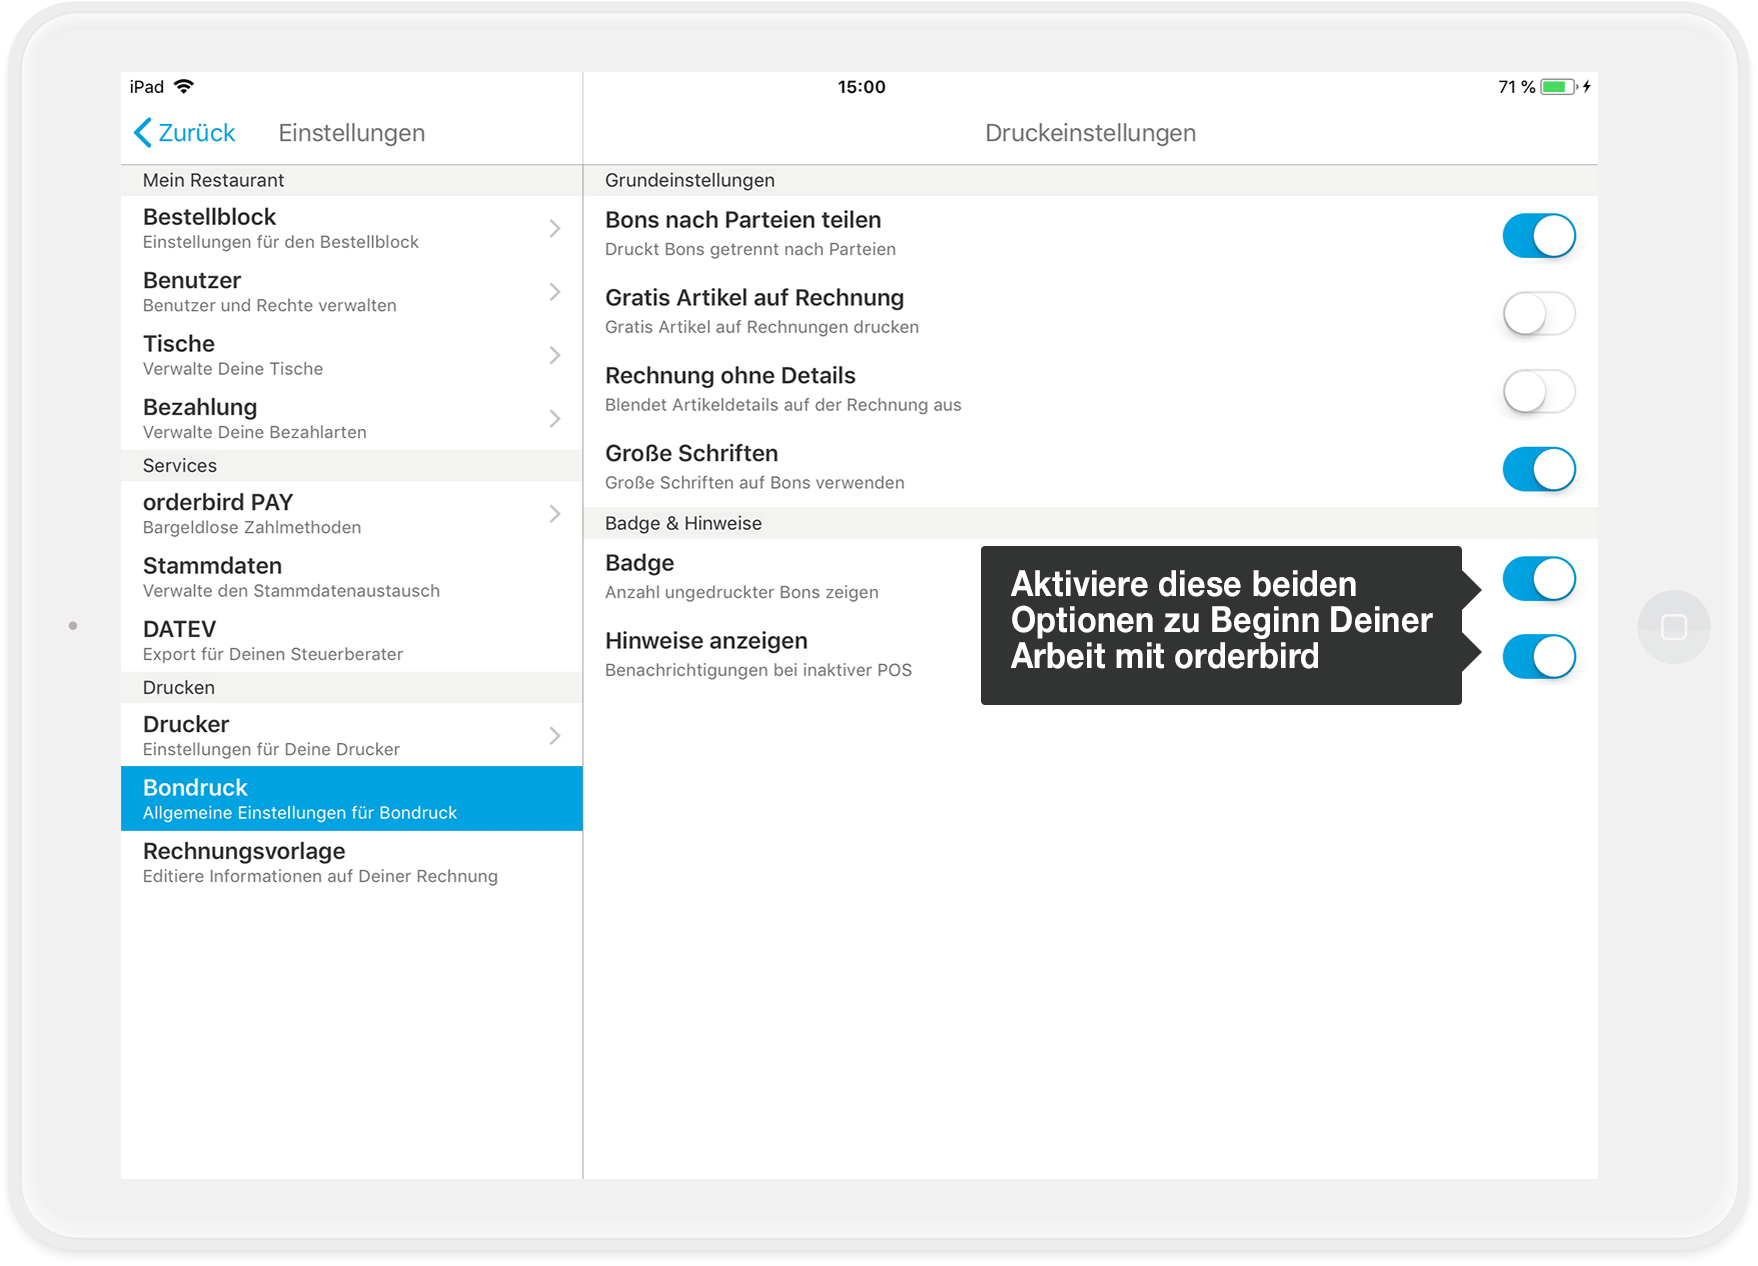
In addition, outside orderbird you will receive notifications if receipts have not yet been printed:
- Simply activate the checkboxes "Badge" and "Show notices".
- In these settings, you can also decide whether free items should appear on the receipt or not.
Please note: No changes in an open shift
Thou shall not make changes during an open shift
Quickly adjusting the price of coffee? Or changing an order flow? No problem, but please not during an open shift!
There are several reasons for this: changes during an active shift...
- ... can ruin your reports.
- ... are not compliant with tax regulations because you have an item with different prices within a single shift.
- ... can lead to technical issues and disrupt your workday unpleasantly.
Avoid the following changes during an open shift:
- items/family groups (including prices and tax rates)
- order flow
- roles, permissions, and users
- payment methods
- deleting printers
Additionally, avoid making simultaneous changes in MY orderbird and orderbird PRO outside a shift.
The golden rule
Always make changes to your menu during a closed shift and either on MY orderbird or directly in orderbird PRO, not simultaneously in both products! This way, you stay on the safe side.