How to set up your network and connect your printer

Table of Contents
Yippee, your starter package from orderbird has just arrived? Awesome, let's get you all set up!
A little background before you start: your orderbird routers and repeaters
Depending on the size of your business, you will need a router and one or more repeaters to set up a stable network. We have sent you one or more of the following components: one basic router, cable repeater(s) and, if necessary, wireless repeater(s).
The basic orderbird router
You need this type of router only once in your hardware setup. It is the main management center of your orderbird network. It will be connected directly to your ISP (Internet Service Provider) router with a LAN-cable.
You can easily recognize this router by the number "1" printed on top.
The cable repeater
You can connect cable repeaters via LAN-cable to your basic orderbird router. Doing so, you are able to increase the range of your network easily. You can connect a maximum of three cable repeaters in series - meaning, one connected to the other to the other. However, we recommend that you connect this type of repeater directly to your base router, whenever possible.
A cable repeater has the number "2" printed on top.
The wireless repeater
Cable connections are stable and secure - and therefore our first choice and the only recommendation we can give you. However, if you were able to convince us that you absolutely need a wireless repeater, please check that the repeater is no more than seven meters away from a cable repeater or the base router. Also, please pay attention to any massive interfering obstacles such as walls, aquaria or a kitchen pass.
Each wireless repeater can be connected to only one cable repeater or a base router and vice versa. In other words, the wireless repeater is always the last link in a chain. You can recognize the wireless repeater by the number "3" printed on the top.
Let’s go! Setting up your router (and repeaters)
Here you can find an example of a common network:

Following the next steps, your own network will be ready and running in no time!
Step 1: Place your routers, repeaters and printers
Place all devices in the best possible location:
- The orderbird basic router should be located as central as possible, since your cable repeaters and possibly also your printer(s) are connected to it. There also should not be any barriers, like walls, preventing the Wi-Fi-Signal to spread.
- Place your orderbird repeaters on high places in your store so the Wi-Fi-signal is easily accessible throughout the whole area. Each device has a transmission radius of approximately seven meters.
- To get a stable transmission of the Wi-Fi signal, please keep in mind there should be as few obstacles as possible, such as doors and walls, between the devices. Also, your router and repeaters should be placed as high as possible (approx. 1.80 meters).
Step 2: Connect all devices to each other using LAN-cables
Plug the LAN-cable into the correct ports on the devices. There are WAN and LAN ports. The graphic above helps you to identify the correct ports: blue= WAN port, yellow= LAN port. Please note that you can find a labeling on the devices themselves. Your printers are always connected to a yellow port (=LAN port).
Of course, you shouldn’t forget to plug them in :)
If you are looking for the ports of your TM-M30 printer, here is a short video from Epson in which you can see where they are located: https://www.youtube.com/watch?v=iQ6-snHD2cc#t=00m53s.
You can also download a two-page short manual directly from Epson: https://www.epson-biz.com/modules/pos/index.php?page=single_doc&cid=5370
Check it: Does everything work?
Your network will be fine if the following lights on the front of the routers light up constantly:
-
 / Lamp #1
 -
 / Lamp #2
and the following light flickers:
-
 / Lamp #9
 Please note
If you do not have an Internet router connected via cable, this lamp may be off.
- All other lights can do whatever they want! ;)
What if the lamps are flashing?
Check all power and cable connections. Replace - if possible - cables to check if cables are intact.
Step 3: Connect your Apple device(s) to your new network
- Grab your iPad or iPhone.
- Open the settings of your Apple device and select Wi-Fi.
- You will now see a list of the available Wi-Fi networks. Select your new orderbird network from this list and connect with it. You can find the exact name of your orderbird network and your password in the first page of the starter guide or in the enclosed note in your starter package.
Tip: Check this step by step explanation on how to connect to a secure Wi-Fi network: https://support.apple.com/en-us/HT202639 - Start the orderbird app.
- Go to Settings > Printers.
- Select the first printer on the left.
- Tap on "Find printer IP automatically".
- A new window will open. Now you will see all available printers and their IP addresses in the orderbird network.
- Select one of the available IP address to select a printer by tapping on it.
- Now you can test whether you have found the right printer and whether everything is working correctly.
- Tap on "Test print" in the lower right corner.
- If the receipt is not printed by the correct printer, simply repeat the previous step and select another IP address.
- As soon as you are finished, click on "Save" in the upper left corner and confirm your changes with "Save" in the following window.
Troubleshooting
I can’t print - what now?
You have followed all the steps, but the app won’t connect to your printer? In this case, it may help to reconfigure the printer. Here’s how:
- Turn your printer off and on again. The TM-30 model is supposed to print a test receipt now. If the receipt is not printed, go on with this next step:
- Make sure your printer is turned on. At the back of the printer you will find a small hole. Poke it with a toothpick or paper clip until your printer prints a receipt. (This works with the models Epson TM-20 and TM-20 II and, if necessary, also TM-30.) The receipt will
-
If the line "IP Address" contains an IP (separate number with dots)please proceed as follows:
- Connect your printer directly to your Internet router (NOT the orderbird base router!).
- Connect to the Wi-Fi of your Internet router (NOT you orderbird Wi-Fi!) on your Apple device.
- Open the orderbird app and go to Settings > Printers.
- On the left side you will find all your active printers.
- Under the name of each of your printers you find a sequence of numbers consisting of four areas separated by dots: the IP address. Write down the IP address from each active printer (e. g. 192.168.1.12). In the end, you should have written down as many different IP addresses on your paper as you have physical printers in your business. If a number is assigned to multiple times, you can ignore the copies.
- Now exit the orderbird app and open the browser on your Apple device (usually Safari).
- Enter the first of the IP addresses from your paper in the browser’s address line, e.g. 192.168.1.12.
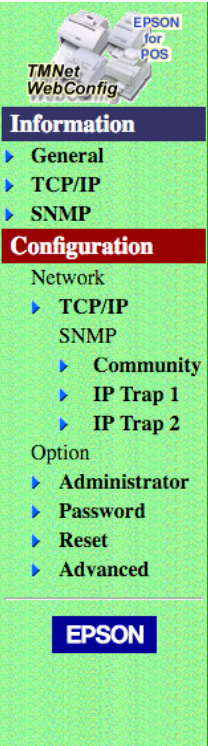
- Now the TMNet WebConfig website has opened. Tap on “Configuration” on the left-hand side and then “TCP/IP”, as shown in the next picture:
- Now change the first line on the right as follows:
Get IP address: Auto - Press the Submit button at the bottom in the middle and press Reset in the following window.
- After a few seconds, the printer's LED lamp lights up in red and the printer's auto-cutter "twitches" briefly. After this, the changes have been applied successfully.
- Wait 60 seconds and turn the printer off, wait for 15 seconds and turn it back on. If you have other IP addresses on your paper, repeat above steps with all printers.
- Now, please go back to "Connect to the new network and introduce the new IP addresses in orderbird" above.
-
If you get the information "IP Address"[NONE], please proceed here:
- Please check again that all cabling is set correctly and that the cables are firmly connected (no loose contacts, no broken cables).
- If you have made sure of this, follow the steps as described above in "Step 3: Connect to the new network".
Everything’s up and running!
If not, email us to help@orderbird.com. We will be happy to help you!